Third Eye Visions
Lighting Up An Led Using Your Raspberry Pi and Python
Once you've setup your Raspberry Pi according to my getting started tutorial, you are ready for your first real project. Let's light up an led using the Python programming language and the GPIO pins on your Raspberry Pi, hereafter called RPi.
What You Will Learn:
- You will construct a basic electrical circuit and attach it to your RPi GPIO pins
- You will write a simple Python program to control the circuit using IDLE IDE
What You Will Need:
- Raspberry Pi configured with the GPIO library
- 1 - small led, any color
- 1 - 50 ohm resistor
- Some small-gauge solid core wire
- Breadboard and/or alligator clips to hold connections
Let There Be Light
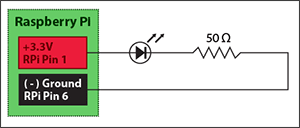
Before we get around to writing any code, let's first get acquainted with the pin numbering of our RPi and create a simple circuit. We'll start by simply lighting our led using the 3.3v pin and the ground pin on our RPi. We will use the following schematic for our circuit:

Before starting, unplug your RPi. You wouldn't want to risk shorting it out while working with it 'powered on', especially since this is our first project.
- Using your assortment of materials, create the circuit on either your breadboard, or using your alligator clips.
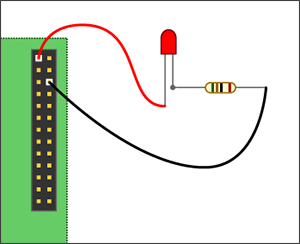
- Pin 1 (+3.3 volts) should go to the longer leg of your led. This pin provides a steady supply of 3.3v. Unlike the GPIO pins on your RPi, this pin is not programmable, and cannot be controlled by software.
- Attach the shorter leg of the led to the resistor. Finally, attach the other end of the resistor to Pin 6 (- ground) on your RPi.
Double-check your connections. When you are done, your circuit should look like this:

Power on your RPi - the led should immediately turn on.
Controlling The Led With Python
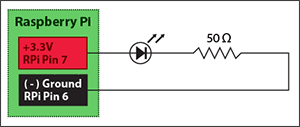
Now that we've tested our basic circuit, it's time to move the positive lead from the 'always on' 3.3v pin to one of the programmable GPIO pins. Here is what our circuit will look like:

- Power-off your RPi again before making any changes to your wiring.
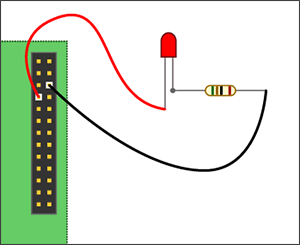
- Move the positive lead from pin 1 to pin 7.
When you are done, your circuit should look like this:

Writing The Code
I like to write my python scripts using the IDLE IDE because it comes packaged with the Raspbian distribution, it's free, and it makes writing and debugging code a bit simpler than when using Python command line or a text editor. It's important to note that when writing python scripts that utilize the GPIO pins, you must run them as a superuser or your scripts will not run properly.
- Power on your RPi and boot all the way into the operating system GUI
- Open the terminal and launch the IDLE IDE as a superuser:sudo idle
- Wait for IDLE to open, then click File > New to open a new window (Ctrl + N)
- Type the following code into the window:
import RPi.GPIO as GPIO ## Import GPIO library
GPIO.setmode(GPIO.BOARD) ## Use board pin numbering
GPIO.setup(7, GPIO.OUT) ## Setup GPIO Pin 7 to OUT
GPIO.output(7,True) ## Turn on GPIO pin 7 - Click File > Save when you are done (Ctrl + S).
- To run your program, click Run > Run (Ctrl + F5). You should see your led light up! We just told the RPi to supply voltage (+3.3v) to our circuit using GPIO pin 7.
If you are having trouble getting the led to light up, double-check your wiring, and make sure you have installed the GPIO Python library according to my instructions. You can download the completed script here.
Extra Credit: Blinking Light
Here is a slightly more advanced script that blinks the led on and off. The only real difference is that we are gathering user input and using the sleep function to set the amount of time the light is on or off.
- Type the following code into the window:
import RPi.GPIO as GPIO ## Import GPIO library
import time ## Import 'time' library. Allows us to use 'sleep'
GPIO.setmode(GPIO.BOARD) ## Use board pin numbering
GPIO.setup(7, GPIO.OUT) ## Setup GPIO Pin 7 to OUT
##Define a function named Blink()
def Blink(numTimes,speed):
for i in range(0,numTimes):## Run loop numTimes
print "Iteration " + str(i+1)## Print current loop
GPIO.output(7,True)## Switch on pin 7
time.sleep(speed)## Wait
GPIO.output(7,False)## Switch off pin 7
time.sleep(speed)## Wait
print "Done" ## When loop is complete, print "Done"
GPIO.cleanup()
## Ask user for total number of blinks and length of each blink
iterations = raw_input("Enter total number of times to blink: ")
speed = raw_input("Enter length of each blink(seconds): ")
## Start Blink() function. Convert user input from strings to numeric data types and pass to Blink() as parameters
Blink(int(iterations),float(speed))
...or you may download the completed script here.
Keep in mind that indentation is very important when writing Python code. Use the TAB key to match the formatting of the above code as you write it.
Something a Little More Complicated...
If you really want to get your feet wet with a more advanced project with a real-world application, check out my irrigation rain bypass project.

